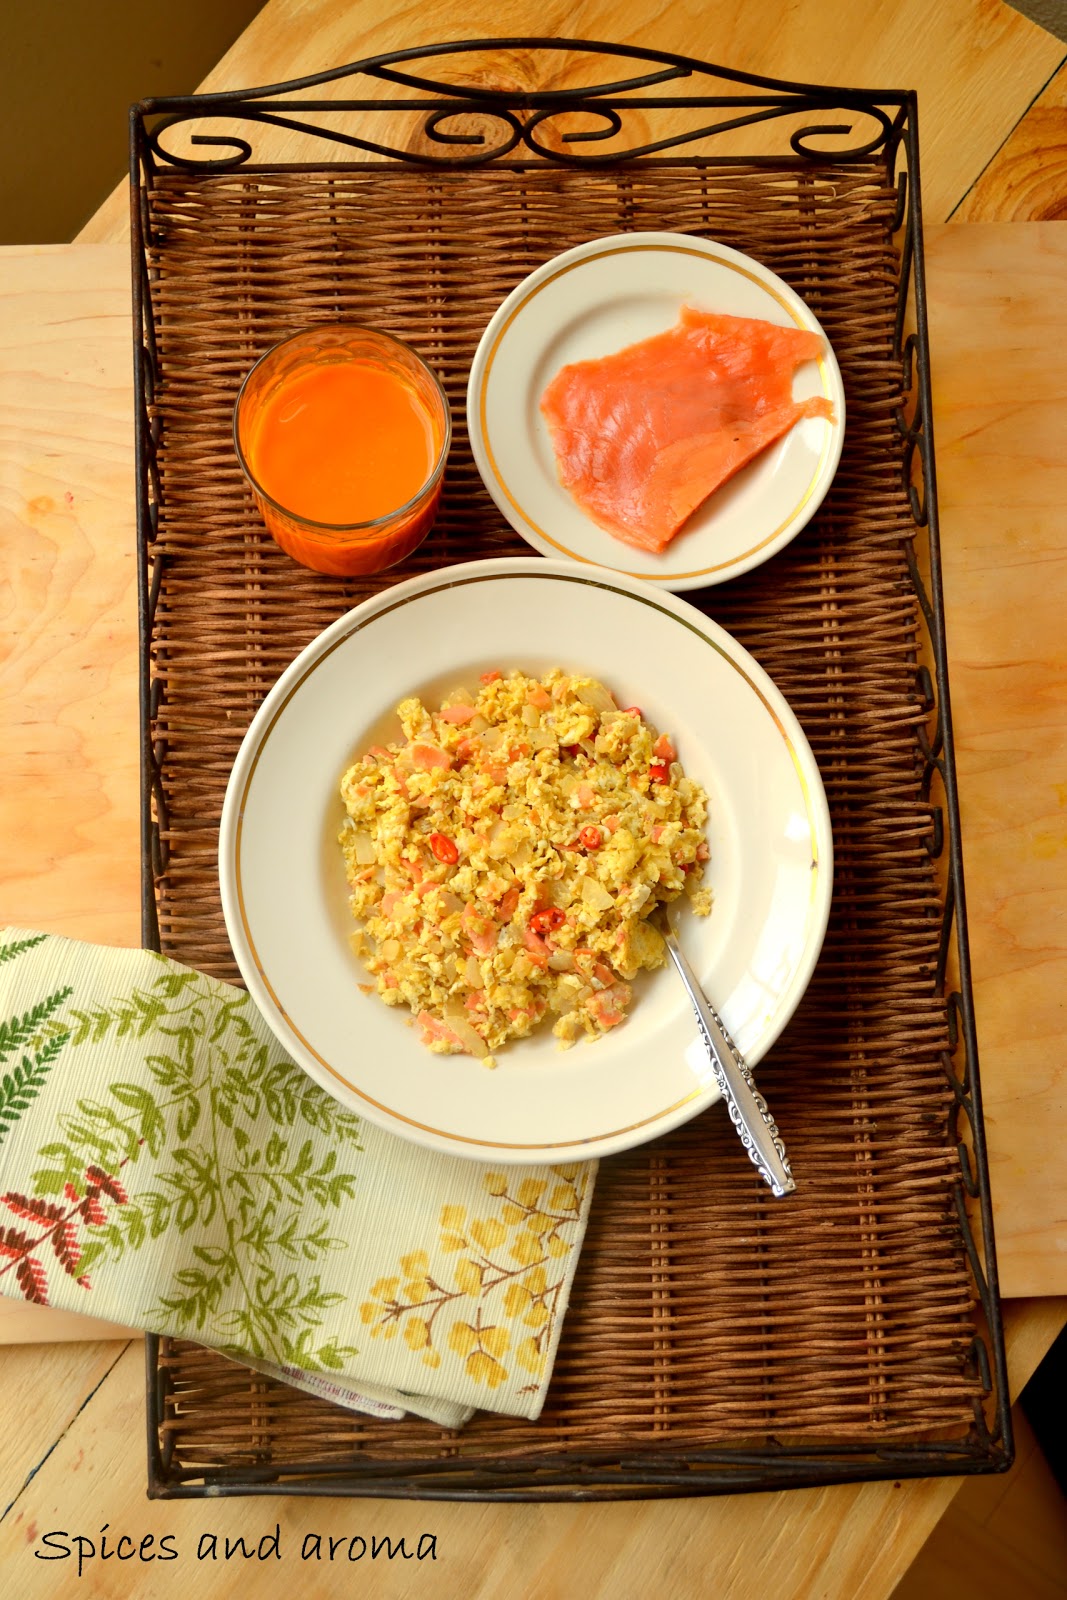
Yet another semi homemade recipe from me to you. Egg scramble with smoked salmon is one easy to fix energizing breakfast. I have read and heard from a lot of health shows that having eggs for breakfast is the best way to start your weight loss journey.
For those of you who buy eggs in bulk, this is the test I recommend to check its freshness.This is what my friend taught me. Place the egg at the bottom of a glass and fill it with water until the rim and what what happens. I did this test today for fun and as I ran the experiment I was explaining the process to my son. Well, he was too cranky today and this was the only way to keep him engaged. It's practically not possible to carry the baby all day long. So, I buckled him in his high chair and gave a plastic spoon to play with and kept talking to him as if I was doing a presentation.
He smiled back and nodded his head as I finished my talk. Alright, coming to the point, what you will find is:
1. For fresh eggs: The egg will lie at the bottom on its side
2. For old yet edible one: Egg will partially sink
3. Throw them away, time for a new one if the egg floats
Remember the smoked salmon I bought from Costco the other day, I make lettuce wraps, sandwiches or omelets with it. The smoked salmon has loads of salt in it, about 20-23% of your daily requirement. So don't add any salt during the cooking. I prefer the ones smoked without any sugar (brown sugar). Look for the ones with zero sugar if you are in South beach diet. This is an ideal breakfast recipe for phase 1 dieters and for those in phase 2 and 3, you can enjoy it with a toast and any zero sugar juice. Egg scramble is an ideal breakfast food to fix for working mothers. You are just stuffing your little ones with good food and I am sure this is also a great dish to fix for anyone.
Serves 1
Ingredients
2 eggs - beaten (you can egg whites too)
1/4 cup onions - diced
1 garlic clove - minced
1/4 cup salmon - chopped
1 red chili - chopped
Pepper
1 teaspoon extra-virgin oil
Directions
1. Heat a saucepan with oil. Once hot enough, add the garlic and saute for 30 seconds.
2. Add the onions and cook till they become translucent. Then mix in the salmon and red chili. Stir to combine.
3. Break open the eggs into the saucepan and stir to cook, about 3-5 minutes on medium flame or until done.
4. Sprinkle pepper to taste and combine.
5. Serve with a toast.
Since I prefer just the eggs for breakfast, I avoided the bread and to wash the spicy scramble down I drank Bolthouse farm organic carrot juice (It's really good, no added sugar - that's what I am looking for). Also I love to eat just smoked salmon with pepper too!
My mom announced idly for breakfast today and our face frowned a bit.
"Ooopsss idly again for breakfast?? Oh god please don't bug us like this" exclaimed my cousin.
This is the typical reaction for idly in any Tamilian's household and that was the incident that came across my mind when I soaked rice and dal for the dosa party on Saturday. Nobody can really imagine the frequency with which this dish gets repeated in every house. No wonder it annoys the family members but trust me your reaction would be totally different when you are miles away from your nest.
I crazily missed idly (ofcourse the spicy-spicy idly podi) during my student days in UK. Ask any true-blue Tamilian for the taste of steamy idly and millagai podi. That person will definitely spare a very bright smile as an answer! Yes, such delightful is the taste of it.
Idlies and Idly podi are every Tamilian's pride and it is THE specialty of Tamilnadu. They have been loyally wedded to each other for ages. Though mistress like sambhar and chutney have tried their best to mesmerize the idly, no one other than this podi can complement it better. Idly and idly podi always a winning combination.
I met Charissa & Patrick of Zest Bakery & Deli at a blogger's meet in Berkeley. Zest bakery at San Carlos specializes in gluten free foods and desserts. Hop over to their page to know more about them. Zest bakery recently completed its first year anniversary and "A foodie and her cooking hat" takes this opportunity to wish them all the luck in the world for more success and fame.
I was lucky enough to taste few of their magical creations and for now, I am in love with their chocolate fudge, they were soft, moist and tastes just the same way as the ones made with traditional bakery ingredients. As their website says their products are great for Celiacs, but still good for everyone. Yes, I totally agree to that statement. Charissa was telling about thier sun dried tomato pasta made with brown rice and herbs and I am waiting to get my hands on that.
They are such warm and friendly couple who will be liked anyone. And I am no exception. I met Charissa again at the SFO food blogger's sale and when she mentioned about the liking for Indian food. I extended my invitation for dinner at my place in July. Since they prefer gluten free diet and since I wanted a meal that would speak about my heritage and about the place I came from, I decided to serve idly and dosa. I prepared dishes that were made from a single batter. Yes, one batter and infinite possibilities!
For the batter Soak the rice, urad dhal and fenugreek in separate vessels overnight or for 4-5 hours. The next day or after few hours, start with grinding the urad dhal and fenugreek together in a grinder. Wait till they get a smooth texture.Transfer to a fresh bowl. Then add the soaked rice. Grind them to a fine paste. Add salt and mix them thoroughly with hand. Let them ferment at room temperature overnight.
Will share pictures on how to make idlies and dosa on my next post. Stay tuned!
Thanks Ramya Bala and Pavithra for sharing your tips on the rice to urad dhal ratios.
When I started with the South Beach diet for the second time, I had my doubts whether I will stick through diet this time. And today when I look back at the last 4 weeks (with 8 days of not-so-South beach friendly dishes during my vacation), I am proud to say that I have so far lost 12 pounds and I am almost reaching my pre-pregnancy weight. Yaaay!!! I just wanted to update my readers about my progress.
Every time while starting a diet, I ask to myself: When is the right time to exercise? Some say early morning in the empty stomach, some prefer to do it in the afternoons and some in the evenings. But I read in some magazine that exercising early in the morning after a long fast (8 hours of sleep) will help burn more fat. So I have started to workout in the morning. I wake up around 6 am and start the morning with Tony Horton's power 90 and on alternate days I do dance work outs (Bollywood music from my laptop too!!!). Tony does a decent job of stretching, power yoga, weights, abs and cool down sessions. He is motivating and I like the fact that he gives permission to listen to the body, take a break when needed and this DVD is a really helpful for beginners. All you need is the self-determination and commitment to do it for 6 days each week. I started with this program 6 days ago and this seems to give some results. Will keep you all posted on the weight lost after few weeks :-)
For those of you who have read the South Beach diet book will know that regular exercise will help in better weight loss and there is a huge possibility that we can avoid weight-loss plateau by swapping different kinds of workout each day like running, elliptical,cycling, floor exercises and workout DVDs.
The post for today is yet another South beach friendly breakfast dish - Quiche. It is a French dish, baked with eggs and milk in a pastry crust. Below is the picture of my breakfast with the Zurich cow bell :-), recollecting that I tasted quiche for the first time in Zurich, Switzerland. The one I had was in a small bakery in the downtown. It was baked with potatoes, ham and spinach. I really liked them - it was so filling, easy on my pocket and so delicious.
The quiche I made is without any crust. Yes, you heard them right. No crust. Since I am still sticking around phase 1, I just baked eggs, veggies, cheese and little milk. I got inspired to try this recipe after seeing Sigma's Breakfast casserole. The best part about this quiche is that they freeze really well. During weekends, I make them in large batches, cut them into my desired serving sizes and freeze them in freezer bags.Everyday morning, I take one, defrost it in the microwave and pour some hot sauce and enjoy this cheesy hot breakfast and to wash them down, I either drink a glass of 1% milk (8 oz) or freshly made tomato juice (8 oz).
Serve 8-10 squares
Ingredients
12 large eggs
1/4 cup fat free or 1% milk
1 cup low fat cottage cheese ( I used the fat free one)
2 cups grated low fat parmigiano rijano and cheddar cheese or any low fat cheese blend
1 garlic - minced
2 cups frozen spinach
3 cups mushroom, any choice - diced
1 large red bell pepper - diced
1 cup red onions- diced
1 large onion - diced
1 tsp red chili powder
1 tsp garam masala
1 tablespoon extra virgin olive oil
Salt and pepper to taste
Method
Preheat the oven to 375F.
Place the cottage cheese in a strainer and run cold water through it. Drain well and just the curd like cheese would be left behind. Beat the eggs along with the milk till frothy. Mix in the cottage cheese.
In a large pan, heat the oil and add the garlic, cook for 30 seconds. Add the onions and cook till soft. Add the chili powder and garam masala and stir fry till the raw smell disappears. Add the bell peppers, mushroom and saute for 5 minutes. Finally add the spinach and saute till wilted. Set them aside.
Spray a large baking dish or casserole with oil. In the bottom of the dish layer cooked veggies and cheese. Pour the egg mixture over and stir gently with a fork to make sure the liquid is evenly distributed over the other ingredients. Bake for 45 minutes in the pre-heated oven till the eggs are set. Once cooled, slice them into small squares or serving size of your choice and freeze them.
Before you serve, defrost them in the microwave and serve with hot sauce.
Tips:
1. This can be enjoyed as a breakfast during all the three phases of South beach diet.
2. You can add ham, turkey or any meat of your choice. Just make sure they are lean, low fat and also pre-cook them before baking.
Everyday we wake up planning to buy organic produce, cook healthy dishes, drink a lot of water and exercise. Sometimes we will make it through this challenge easily while some days we need to crack our head to find a recipe that would please our palate and our family too. Nobody wants to see frown faces in the eating table right?
That was my state during my pregnancy. I had gestational diabetes since the last trimester of pregnancy and had to watch on what and how much goes inside my mouth. Careful monitoring of sugar level was needed. My dietitian advised me to include whole grains in every meal as they are complex carbohydrates and it takes a longer time for the food to get broken down to sugar. This way the sugar level can be maintained well.
That's when I was introduced to quinoa (read it as "Keen-Wa), a South American grain rich in protein. They come in red and white color. When I shopped it for the first time, I could find only red variety and since then haven't thought of buying the white one (Don't ask me why!). I tried making upma, fried rice, salad and even idly and dosa with quinoa. Since I had to follow a strict diet chart and because of harmonal misfire, I was always irritated and moody. I thought to myself "Oh god! I can never eat all this after my delivery". But I was wrong, within few days of starting this kinds of food, I started to play around few recipes and spice levels. They taste absolutely yummy to me. Healthy foods can be delicious was my conclusion at the end of these experiments.
Whole grain idly is an ideal breakfast/dinner dish for Phase 2 and Phase 3 of South beach diet. and also for women with gestational diabetes.
Here is a very simple quinoa-ragi-oats idly recipe. I found the idlies to be soft when served immediately and so filling (with just 2) . I have tried to store it in the fridge and re-heat the next day. It tasted pathetic to me. May be you could pour oodles of sambhar to get rid of ragi's smell. Otherwise they were great when eaten fresh. Since they are instant idlies, you could prepare the batter fresh and I didn't like the idlies made from stored batter.
Ingredients
1 cup red or white quinoa ( I used the Inca organic red quinoa)
1/2 cup old fashioned oats
1/2 cup ragi flour
1/2 cup semolina
1 cups plain yogurt
2 tbsp cilantro - chopped
1 tsp baking soda
Salt to taste
Method
Heat a dry pan for 2 minutes on high. Once hot enough, lower the flame and lightly roast the quinoa and oats separately without oil for 2-3minutes. Once cooled , grind them to a fine powder in a blender (each separately).
Mix the semolina, ragi flour, salt and baking soda with the powdered quinoa and oats. Initially add about 1.5 cups of yogurt and mix them well with a spatula. Add the chopped coriander leaves and add the remaining yogurt and stir to combine.
The batter should be similar to a normal idli batter consistency, if not add some more water. Grease the idli moulds, and the pour the batter, steam it in the cooker until the idli's are cooked.
Serve warm with sambar and chutney.
As promised here is the recipe for delicious Aviyal. It is the easiest dish to fix even on a busy day. Yesterday, I saw my fridge with 2 carrots, 1 raw banana, few beans, 1 brinjal, 1 potato, 1/4 packet frozen peas. Those vegetables individually can't made into a curry, but using them all together can help me cook a decent amount of aviyal for dinner. I fixed them in less than 20 minutes. S relished it and after finishing our dinner, we refilled our plates with just aviyal and licked our way through the fingers :-) Incredibly yummy!
Every vegetable (except peas :-)) has a uniform lengthwise shape which is 1" in size and that's one thing which my mom insists every time I cook this dish. The addition of flavorful coconut mixture infuses a lovely flavor to the entire dish perfectly and the use of whipped yogurt makes them more creamy. The key ingredients, curry leaves and coconut oil adds a wonderful aroma and earthly flavor to the dish. So never even think of making aviyal without having those stuffs in your kitchen shelf. Trust me, they are so simple to make. Do give it a try!
Method
Cook all the vegetables (except frozen peas) in a pressure cooker for 1 whistle. Set them aside.
Grind the coconut, cummin seeds and green chillies to a fine paste. Set aside.
Heat oil in a cooking pan. Once they get heated up, add the curry leaves and cooked vegetables. Cook for a minute.
Add the coconut paste and give it a complete mix. Add salt to taste and cook till the raw smell of the coconut disappears. It takes about 5-6 minutes. Always cook in medium low and be careful not to mash the vegetable while sauteing.
Finally add the yogurt/ buttermilk and mix thoroughly. Check for salt and drizzle little coconut oil on top. If you find them very thick, you can add very little hot water to dilute the thickness.
Serve it with adai (recipe here) and can also be served with rice and sambar.
Adai is one of the closest cousin to dosa. It is made from a batter comprising of equal portion of lentils and rice. The addition of dry red chillies, ginger and garlic makes the dish more delicious and the final tempering with curry leaves, asafoetida and onions takes them to another level. Unlike the dosa/ idly batter, these don't need any fermentation time and the rice-lentils requires good amount of soaking time. If you plan to serve them for dinner, soak them by mid morning and grind them in the evening. The store the left over batter in the refrigerator and they can be used for 2-3 days.
Even in a South Indian household, this dish is not as famous as idly/dosa but my mother makes this almost once in two weeks. The adai tastes best with aviyal (recipe on the next post) and that's the famous combination ever. I love aviyal and most of the time I eat just that. When there is no time to prepare aviyal, my mom serves them with with butter and jaggery or a simple tomato chutney.
The one place other than my home where I enjoy this lovely crispy adai is in the Saravana Bhavan restaurants. After days of travel , I desperately craved for delicious South Indian food and ended up in Saravana Bhavan, Singapore and relished yummy adais. Such is my association with adai and I have a craving for them every now and then.
The recipe is so simple and anyone can fix it. Since it has lentils in it, adai is rich in proteins and the tiny bits of onions and roasted urad dhal makes every bite crunchy and tasty.
All it takes are: Soak, grind, temper, cook and serve!So nothing should hold you back from trying this divine delight.
Ingredients
1 cup parboiled rice
1/2 cup toor dhal
1/2 cup channa dhal
4-5 garlic cloves
1/2 " ginger
2-3 dry red chillies
1/4 cup onions - finely chopped
2 tsp asafeotida
1tsp mustard seeds
2 tsp urad dhal
10-12 curry leaves - finely chopped
Black pepper balls - Partially crushed
Oil
Sal tot taste
Water to grind
Method
Soak the rice and dhal in a separate bowl with 750ml water for 4-5 hours. Also soak the dry red chilly is any one of the bowl. Set them aside. Once done, drain the water completely and grind them with ginger and garlic to a coarse paste. Use minimum water. The batter will be thicker than pancake or dosa batter.
Heat oil in a small pan and add mustard seeds, urad dhal, asafoetida, curry leaves, onions , black pepper balls and salt. Add them to the batter and mix well.
Pour a ladle full of the thick batter in the center of the heated non-stick tava/ griddle and spread in circular fashion with the back of the ladle to form a circle. Drizzle oil around the edges and let it cook for 3-4 minutes and flip it over for another few minutes. They should be brown and crispy. Always cook them in medium flame to avoid burning them.
Serve with a dollop of butter on top and chutney/ idly podi/ jaggery.
Note:The first one will always take longer time to cook, hence be patient when you start making them
If you want to experience the authentic "Kaaram" (spicy) taste that a non-vegetarian Tamilian dishes are known for, then this dish - Kathirikai Kari Kozhambhu (Brinjal Mutton Gravy) is the right one to start with. The original recipe calls in for a fiery hot gravy which is sure to set the tongue on fire. I have modified it to my palate. If you wish, you could increase the spice level. The bony and fleshy meat pieces were steam cooked with the spongy brinjals/eggplants, tomatoes and onions sauteed with the home grown Indian spices. The finely cooked brinjal adds a great volume to the dish and makes it thick and creamy. They taste heavenly and irresistible with rice/ rotis / bread.
My gravy was a true hit in every way and S loved it so much. They tasted so similar to my achi's version and I am really proud about that. The taste was so authentic that it reminded me of my grandparent's rural Tamil Nadu, where the houses have small chimneys letting out aromatic smoke of charcoal and flavorful curries and we would smell the dishes while playing in the backyard. Every Sunday of our summer vacation would begin with Kari Kuruma (Mutton Curry) to go with idly/dosa and then Aatu Kal Rasam (Mutton soup with bony pieces) as a mid-morning appetizer and delicious Mutton briyani and left over kurma for lunch.
As I slide-in a spoonful into my mouth, I was mesmerized with those thoughts , I could feel the smell of that air and I could hear the bustling sounds of my playmates and it was a trip down the memory lane. I relished every morsel and it was a hearty meal. We ate that with whole wheat bread the following day. We couldn't get enough of it! Yummy!
Serves: 5-6
Ingredients
2.2 lbs / 1 kg mutton chunks
3-4 brinjal / eggplants - cubed
1 large onions - vertically sliced
1 tomato - chopped
4 green chillies
1/2 tbs ginger-garlic paste
1/2 tsp turmeric powder
1-2 tbs chilli powder
1 tbs coriander powder
1/4 tbs garam masala
1/2 cup coriander - chopped
1-2 tbs oil
Salt to taste
500- 750ml water
Method
Heat the oil in a pan. Once they get heated up, add the onions and let it sweat. Cook for 5-8 minutes and let it brown. Now add the green chillies and ginger-garlic paste and cook for further 2 minutes.
Now throw in the brinjal and tomatoes and let it soften for 3-5 minutes. Cook them all on medium high. Once done, add the mutton chunks and saute for a minute.
Finally sprinkle the turmeric powder, chilli powder and coriander powder and cook till the raw smell disappears. Pour in 600 ml water and give it complete mix. Adjust the water requirement according to the amount of gravy needed. Add the salt, garam masala and coriander leaves and mix well. Check for taste before closing the pan. Cook for 7-8 whistles.
Serve hot with steamy rice. They can be served for breakfast with idly/dosa too.
Note: If the gravy is too thick add little hot water to dilute them.
If it is too watery, dissolve 1/2tbs corn flour in 1 tbs water and add to the hot gravy while on flame. This will thicken the gravy well. Adjust the spice level accordingly. I usually heat oil in a small pan and add 2-3 tsp chilli powder and cook for couple of minutes to get rid of the raw smell and pour over the cooking gravy.
Friday evening:
As S reached home from work, I was ready with his cup of hot chai and pakoras. (Generally I start making the chai only after he arrives)
He went on "Whats the matter? Chai is ready so soon and also garam-garam (hot) Pakora."
"Nothing!" I replied and winked.
After few minutes........ "Sigh! Ahem!" I said sitting on the couch, sipping my cup of Chai. (No response from S)
"Louder siiiigggh!" (Again no response)
"uuh! oooph! ooh! (Louder)" - Finally he noticed my gestures after flipping through all the channels on the Tele.
"OK - what are you trying to convey now?" A pretty direct question from S. He always catches me when I try to get smart he he!
"Well! umm ! ok! I dont have really good glasswares to present my blog pictures" I replied with a innocent tone.
"I knew it honey, when my chai was ready well before the actual time! So where do you wanna go now?"
"Kohls! Bed,bath n beyond!" I yelled back showing all my 32 teeth.
We had been to Kohls and Bed, bath n beyond yesterday to buy few crockery. Kohls had gorgeous collections of the crockery and cutlery that comes in Food network. I wanted to pick everything on the rack (eeeeeeeeeeeh!!!) and it was so bloody tempting and such a lovely treat for the eyes. I was on girlie treat for myself so I went on slow-pace shopping. When I saw fumes coming out of his ears, I realized that its high time I wrap my shopping. S went really wild for making him wait for long in those shops.
When I was billing my item I jokingly said "It isn't easy to be married nah?!!".
Ooops! his fumes became more hot and steamy that the shop's smoke-alarm started screaming aloud. Well, it wasn't a right time to rub him on the wrong side.
I am sure when you read this, every one of us will be connected to a very same situation in life. :-)
Here is a sneak peek of the stuffs I bought from there.
Since I really tortured him (yeah, that's the word he refers when I take him out for shopping) yesterday, I wanted to cook something authentic and yummy for his taste buds on Saturday. I made appam with chicken curry for breakfast. A perfect comfort food for the birds who left their nest years ago. This is goes as a little bribe for my loving, to-an-extent patient and of course amazing husband.
Since any chicken curry tastes brilliant the next day, I made the chicken curry on friday night itself after we returned from my shopping expedition. I had already soaked the rice and lentils in water that morning. I made the batter that night and left them in the oven to ferment. (ofcourse oven wasn't turned on!)
The post for today is a deliciously warm and tasty chicken curry with Indian spices. I prefer the gravy to be bit-watery as its served with appam. So if you guys want it to-be thick, reduce the amount of water accordingly.
Ingredients
1lb chicken breast
2 tomatoes
2 onions
2 green chillies
1-2 tsp chilli powder
1/2 tsp turmeric powder
3-4 tsp coriander powder
1-2tsp ginger-garlic paste
1-2 tsp coconut (dessicated or fresh)
1 tbs yogurt / curd (low fat or fat free)
5-6 curry leaves
1-2 sprig coriander
1-2 cup water
1tbs oil
Salt to taste
Masala
2 cardamons
2 cloves
1/2" cinnamon stick
1 tsp fennel seeds
Method
Grind the onions, tomatoes and green chillies to a fine paste. Keep aside.
Cut and clean the chicken into small chunks. Keep them aside in a bowl.
Heat the oil on medium high in a cooking vessel. Once the oil is heated up, add the masala and cook for a min.
Add the above made paste and salt in the tempered oil and cook on low flame for 10-15 min. Cook till the oil separates from the tomato-onion-green chilly paste. Now add the turmeric, chilli and coriander powder. Saute till the raw smell disappears.
Throw in the chicken chunks and cook for another 5-10mins. Add the ginger-garlic paste now and cook till the raw smell disappears. Pour in the water and tear the curry leaves into the gravy and cook-covered for 15-20 min. Once they chicken is done, sprinkle the shredded coconut and mix in the yogurt/curd. Check for the seasoning and add salt, if needed.
Its mid date of July and this is my first post for this month and I am blogging after a month - Shame on me! I aint regular to my blog and I ain't visiting other blogs and I really don't have a reason to justify that. Not that I was caught in a whirlpool of work, its just sheer laziness to get back.
I have been cooking a lot of South Indian dishes for S. Poor he - always asks with an excitement when he sees the food on his palate - "When are you gonna blog this? Tastes yummy and good". I give a tepid smile as a reply. I keep telling myself about taking a pic of the dish after dinner but I don't find anything left on the kadai/wok late that night and this what has been happening for the past few weeks.I make food in little quantities; just enough for one meal. Well, this sounds like a silly reason for you guys. Ya, I could take a pic before my dinner! but you know the hunger pangs during the cooking itself - munching a bit a carrot, a cookie, few peanuts :-) , so I jus wanna get done with the cooking and eat. I keep telling to myself "Tomorrow I will do it for sure" (eeeeeeh) .
I have been procrastinating this little passion of mine for a long time and the thought that my fellow foodie-friends would have forgotten me and my blog, brings me back to senses to be regular. Today I am back with a little hope and enthusiasms to post my recipes often.
The post for today is Veggie Paratha and this is especially for moms of young kids - This is dish is definitely for you to stuff them with all the good things in one meal and this is also a perfect dish for working women. This paratha is simple, nutritious, healthy and tasty. Its a good source of all the vitamins, minerals and fibre in one pack.
I generally chop all my left over veggies (carrot, beans, cauliflower, spinach, cabbage, beets) in the food processor and store them in the freezer. I thaw them before use and add onions, little ginger, green chillies, salt and tofu. Its better to add the onions during cooking as stored ones leave a pungent smell on other veggies.
Ingredients For the stuffing:
1 carrot
1/2 beet
5-6 florets cauliflower
Small chunk - Cabbage
10-15 spinach leaves
10 beans
1 finely chopped onions
1/2 inch ginger
1-2 green chillies
1/2 cup grated tofu
salt
oil
For the dough:
Chakki fresh atta (Can be bought from Indian Grocery shop)
Salt
Water
Method
Remove 2-3 cups atta on to a fresh dry bowl. Add a pinch of salt and mix them well. Add water little by little and knead them into a soft dough. Let them rest for 10-15min.
Chop all the veggies in the food processor to 1mm small chunks. Add finely chopped onions,ginger, green chillies, salt and tofu. Mix them thoroughly and set aside.
Divide the dough into equal small balls of 1-2 cm diameter. Roll them out in to a larger circle with a rolling pin and set aside.
Heat a non-stick tawa and cook on medium high. First place one rolled out chapati and gently spoon out the veggie mix on top. Spread them over the entire surface of the chapati with a back of a spoon. Place another rolld out chapati on top of it. Wet your fingers with water and seal the edges. Drizzle few drops of oil along the edges.Cook them for 2-3 min on one side and flip it over. Cook for another 3-4 min. Chapattis will be lightly browned and thats the indication that its cooked.
Optional: Spoon a dollop of butter on top of hot steaming chapati before serving.
Serve hot with tomato ketchup/ yogurt seasoning / Indian curries.
HAPPY BIRTHDAY ABHI KUTTA - my most favourite kid in this world! Hugs and kisses. Hope you had a blast.
This is yet another simple recipe from my grand mom's kitchen. The sweet dosa can be made in a jiffy and this was mostly my after-the-school snack. It is eaten with idly podi and its perfect for people who love sweet-spicy combination in their foods. These are the best ones for evening snack and an excellent alternative when one runs out of idly/dosa batter. This dosa and hot masala Chai is just perfect for the season.
Ingredients
2 cups maida / all purpose flour or whole wheat flour
1/2 cup rice flour
1/4 cup jaggery or coconut palm sugar
2-3 cup water
A pinch of salt.
Method
1. Dissolve the jaggery / coconut palm sugar in 1/2 cup water and keep aside.
2. Mix the maida / whole wheat flour, rice flour and salt well in a bowl and pour in the jaggery water.
3. Slowly add in the desired amount of water. Beat them to a rice-batter like consistency. Let it sit for 10-15min.
This is a typical scene at my residence at 7.30 am:
Me ---- always on heels to wrap my breakfast early n drive down fast to work. Like a typical girl of this century, I would flip down the cornflakes box upside down with a force into my bowl, hardly realizing that its gonna over fill it… then take a handful or more and then put that back into the box….(huh I create a huge mess in my breakfast table) add few apple slices, cold milk and a dash of nuts to it and sit with a newspaper in my living room. My granddad had been watching these kinda episodes for few weeks and every time he spares a cynical smile in his wrinkled handsome face,I look at him like “Forget it thatha.We both are from two different corners of the world”.
My grandfather calls this being “pseudo western” and considers this breakfast food too expensive and not so nutritious as his native ones. He doesn’t like us aping things just for the heck of it. He is too hooked up to the fact that age-old cooking/dishes is always better than the current microwave ones. It’s too difficult to argue with him.
He has been raised in a village near Chidambaram (a town in the Cuddalore district of Tamil Nadu, India) and he later moved to Cuddalore for his living. He has always been living in a pollution-free and eco friendly environment; his beautiful native village smells of moist sand, pure air and breezy evenings, slowed paced lifestyle, neighbors exchanging warm smiles, afternoon chats with them in the verandah, economical foods, vegetable n fruits sans fertilizer smell, simple living, in short: it is a heaven on earth for him. Once he moved to Chennai to live with us, both my granddad n grandmom couldn’t survive here for long. Since then, they keep visiting us once in a while and they preferred to remain as guests.
Now about the post for today.
Last week, he suggested me to have Arisi Kanji (a Tamil term for rice porridge) for breakfast. I gave an expressionless look and wondered the reason he suggested that to me.
“Try it once. You wouldn’t get back to your cornflakes anymore” said my granddad in a very confident tone.
Believe me, he was right! I stopped buying cornflakes anymore. :-) (wink)
He shared the recipe with my mom and she dutifully bought the ingredients for it.This porridge has hand pounded rice and red rice in it. They have a very earthly simple taste. My mom and I renamed it as “B-complex porridge”. This porridge is rich in Vitamin B complex. Vitamin B complex group comprises many vitamins, which includes thiamine B1, niacin, riboflavin, pyridoxine B6, biotin, cyanocobalamine B12 and folate. Vitamins cannot be synthesized in the body in adequate amounts and therefore it should be supplied in food. Instead of opting for pills, it is healthier to eat vitamin rich foods, because vitamins are best absorbed in their natural state. They are necessary for the metabolic reactions of the body and its deficiency can lead to various illness.They are also present in whole grains, wheat germ, brown rice, nuts, beans, milk and milk products, eggs, fish, liver, raw green vegetables.
Do try this, its very healthy and easy to fix.
Ingredients
1 kg Hand pounded rice / Kaikuthal arisi
1 kg red rice
200 gm barley
100 gm horse gram
2 tsp shredded fresh coconut
Salt to taste
3-4 cups water
Method Clean the rice with running water and let it dry for a day. Dry roast the barley and horse gram.Grind them all together to a coarse powder-like form. The rice should have a broken look. Note: They should not be ground into a fine powder.
Store them in a dry container and they could be used up to 4-6 months. To prepare the porridge:
Boil the water in a vessel. Add about 1-1 1/2 tbs of the above made porridge mix to it. Gently mix them and let the rice cook. If you would like the porridge to be watery, add little more water. Add salt and shredded coconut to it. Mix thoroughly and serve hot with mango/amla pickle / any thogaiyal.
Thanks "B" for the beautiful flowers and lovely words. You brought a huge smile in my face. I was really surprised girlie! hugs n muuuaaaaaaaaahhh!


